OR CTRL + N for new document, that clears everything on canvas.
Document menu:
Saving the document WILL NOT save your 3d work (or Ztool).
The background gradient of the canvas is controlled by (Document Menu) Back, Border, Border2.
Change color - click on "Back", choose a color from color picker.
"Range" changes the "gradient" of the canvas. Get rid of the gradient - set to 0.
Increase the level of gradient with "Center".
"Rate" is how fast does the gradient change.
To change the size of document, make sure you remove your 3d model first.
WHEN importing multi object - FIRST import the largest part, thats how Zbrush handles scaling. Then choose the largest object and in subtools - append the rest of them.
GRID: Draw: Grid Size (change). ALso FLOOR has button selections for X, Y and Z.
If the normals are the opposite from Maya to Zbrush - select the object with inverted normals, go to DISPLAY PROPERTIES in Tools menu - click on FLIP.
- PRESS CTRL over a button to get INFO for it.
- Turn LOCAL On - RHside "local" THE PIVOT POINT - the last point I click becomes the pivot point
- Geometry DIVIDE - go up on res level press D; go down press Shift D
- To be able to see inside the model - in tools on bottom DISPLAY PROPERTIES - Click
and activate DOUBLE
- For more accurate selection >> use POINT SELECT ON >> in Transform menu
- PREFERENCES ->PERFORMANCE-> MultiDraw OFF
- MASKING - CTRL ALT - to sharpen the mask, CTRL to soften the mask
- Remove material information - go to Flat color and prezz Zadd and M, fill object.
- Smoothing Divide - if you turn SMT off, it will divide but edges will be still the
same.
- to SubDivide a particular area on your model, MASK off the part you dont want subdivided - be sure to be on the LOWEST SDIV level, hit Divide.
- Press SHIFT + F - to show polygroups and wireframe.
POLYGROUPS (in tools)
autogroups - will separate all subtools (separate objects)
uv groups - separate by UVS
GROUP VISIBLE - separate by selection
(to select polygroups - Ctrl + Shift + Click
Make polygroup out of masking shortcut: Paint A MASK - hit CTRL + W = make polygroup out of the mask (from visible)
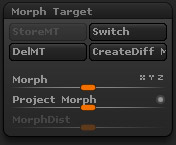 MORPH TARGET
At first may seem abit strange and hard to make it work, but once you understand it - its great.
BE SURE to store MORPH target on the HIGHEST subdivision level you are on! See the image - this appears in the morph menu when youhave a morph target stored.\
*TIP - always a good idea after you stored the MT, to use Layers when sculpting
IF by any chance you have stored MT on lets say Sub-div 3 and youhave already sculpted some details on the model, or on layers, and now you decided you need to go a level up to SubDiv 4. Duplicate your subtool, delete all the sculpting (layers) or use MORPH brush to erase all detail! Now you should have a original subtool with detail and duplicated subtool with NO detail. On duplicate delete the morh target, go level UP and Store again MT. Now start projecting the settings from original one by one to the duplicate!
If we are going to export from Zbrush model back to Maya - is NOT a good idea to do
a GROUP SPLIT (from zbrush)
GOZ is little tricky and often going back and forth between Zbrush and Maya should be with extra care! Save Often (and make new ZTL files in case something got skrewed you can always go back to a previous state!).
*To clear the clipboard of Zbrush - exit Edit mode, CTRL + N - cleans the canvas area, click the BIG S (SimpleBrush) icon under Tools, choose your model again draw on canvas ENTER EDIT mode.
If you have a problem is with the X symmetry, like trying to sculpt something but you notice that the symmetry is not even. You need to mask out the half of the character you're happy with
and then go to Tools>>>Deformation tab and find Smart ReSym - it should fix the problem. It copies the masked half across.
SUBTOOL MASTER - organizes different objects exported from Maya into Subtools in Zbrush
TRANSPOSE - manipulate multiple objects inside Zbrush. In edit mode of object - move, scale ot rotate - click on of those. Draw an action line - We got 3 different point to manipulate.
MOVE SELECTED - Click on center wide dot - reposition the model. Click outside red dots - Scale or sheer the model. Center of the dots - does the action, moves the object towards the other end of 3 dots. If we click the EDGE of dots will reposition action line.
SCALE SELECTED - center dot = scales along the axes, perpendiculat to action line end dots scale towards the other side.
ROTATE - use thes as a lever.
Mirroring OBJECTS with Subtool Master.
When you have your subtool and want it mirrored (on X) for example a shoe, make sure you have your layers baked in, before mirroring (because it will encounter problem).
---------------------------------------
DYNAMESH
Group will split polygroups into separate pieces
Blur smooth out the mesh
POLISH - great - polishes geo (LIKE creasing edges)
CLAYPOLISH!!
Project - keeps the detail as is
ADD geo in Zbrush - mask, hold CTRL + move.
REMESHING in Z
Remesh can be very useful but sometimes a pain to do.
Make sure your low poly mesh (geo) is all equal and nicely even quads. Close all holes and gaps, because remesh and projecting in general in Zbrush do not like any cavities. Also WHEN PROJECTING - make sure your faces are NOT overlapping, and normals are flipped the right way.
Import your low poly model (one piece and should NOT be complex!!), the pieces of your model have to be logically separated, do not remesh a complex whole mesh, better separate in Maya and close all the gaps. You can remesh as many subtools as you want.
Divide the model a couple of times (do not exceed subdivision 4, 5 or 6 - depending on polys and complexity). Choose a higher resolution for better remeshing (by default is 128), choose a value for Polishing (default is 10). Remesh all.
After the piece is remeshed - divide it a couple of times so it matches his master. With both subtools VISIBLE, click project all.
HOW TO UV a remesh.
This task can be a little tricky - due to the high poly content of the remeshed tools sometimes.
Lets say you have a piece (subtool) on SDiv 5, that needs to be remeshed.
* Does the new remesh carry the same UVS as its master? When you do REMESH - it comes WITHOUT UVS.
So how do we do Uv on a remesh? Fisrt off - for a BIG heavy original piece that needs to be remeshed - use low remesh settings, make sure the new remesh is accurate to the original, otherwise you dont want holes and gaps in your new remesh.
Also note that UV master CANNOT handle LOTS of polys!
So with the newly created (kinda low poly) remesh, use UV master to unwrap. If you get an error doing unwrapping in Uv master, i think that your remesh has to be lowered on polys.
I do this 2 ways:
1. Either change settings for resolution when you create the remesh.
2. Or bring in Maya and:
- LOWER polys (Polygons - MESH - REDUCE) - bring back to Z.
- you can also make quads faces (remesh in Z used triangles as well as quads) Mesh - Quadrangulate, so when you bring back in Z - also check if under Tools - Geometry - Reconstruct SubDiv.
*Tip about UV Master, you can use existing UVs from imported model and work on that in UV Master - just click "Use existing UV Seams" button before you hit "Unwrap".
UV MASTER:
Making Uvs for a human head.
Open UV master - Zplugin - UV Master
Symmetry ON (if the head is symmetrical), Enable Control Painting (ON, it will lit in color orange).
Click the button Attract - and start painting WHERE you want your seems to be. Make sure the blue line color of your paint is connected (for the seems).
Click Protect - start painting (red color) the FACE, so it protects the face from being cut on seems.
Click Unwrap. To check the Uvs - Click the button Flatten. You MUST be on the lowest subdivision level for that feature to function.
To go back in 3d view in Zbrush - click Unflatten.
How to RENDER:
When you have a model you want to render, go Document and change width and height - make the size of the desired render. This will clear your canvas, so drag your model again, hit Edit. In Zoom Menu hit AA Half so you have Antialiasing. Click Render Menu and hit Best.
You can Document> Export image as .psd, .bmp or .tiff or PrintScreen.
* Step by Step How to:
Open you model in Zbrush - applpy material. Go to Document size and make it double as much as you wanna render - lets say 4000px x 3000px. Clear your canvas (CTRL + N) drag your model, press T to do to Edit mode. On the upper right corner ise ZOOM button to pose your model inside boundaries of document. Then click Actual (for actual size) then CLICK AAHALF - that turs anti-aliasing on. Open render Menu, make sure buttons Shadows and AOcclusion are ON. CLick BEST (for render), wait for image to render and dont click anywhere else (it will exit the rendering mode) - click Document - export and export your image in one of the 3 formats - .psd, .bmp or .tiff.
DECIMATION MASTER
Decimation Master is used to create a model with lower polycount while still keeping most of the details. It's vey easy to use. Its a plugin you have to install separatelly in Zbrush (but its free). Its located under Plugin Menu - decimation master. When using Decimation, sometimes you dont really see anything happening (of course depending on settings), so to see difference Hit PolyFrame (Shift + F). What is actually does is automatically reducing your mesh.
If you have multiple subtools you can choose from the following:
Pre-process current - processing the current tool you are on
Pre-process all - processing the whole tool
Then choose either:
process % percentage
process K polys (you can assign any number of final result here)
Process K Points.
Once you choose the decimation quality you may:
Decimate current (for current subtool you are on)
Decimate all - for the whole tool.
*Another trick is - if you are on a subtool, you can mask off the desired areas which you want decimation to retain resolution (try to mask with LOWER intensity of color, so its more transparent) - then pre-process current, then decimate current. Its gonna tell Zbrush to kind of retain the geometry in this area.
* Good tip - when you decimate all your subtools - you can do all in one or separately one by one.. but in the end - click EXPORT button - it will export all your subtools as .obj file.
-------------------------------------
SPOTLIGHT 0 is located in the texture menu.
Open TEXTURE menu (on the top) drag it on one of the sides. Import an image. There are some buttons right under the images (the spotlight buttons) the 4th one from left to right - with a + and - sign on it. That loads the image you have selected into the spotlight. To TURNO off the spotlight with hotkeys - press SHIFT and Z. To show the spotlight circle press "Z" for on and off. (Z key to bring up the Spotlight control wheel).
You can also SAVE the spotlight and load it.
Useful small ZScripts and Macros for ZBrush 4 & 4R3
ReplyDeleteLINK:
http://www.zbrushcentral.com/archive/index.php/t-94752.html